
Now that you have your handy dandy Church Graphic Design Kit , we want to help you out with the editable Church welcome cards that came in it.
Once you the Welcome Card file open in InDesign, it's time to make it your own. Maybe you just love the way it looks and are fine with hitting "print" and moving on. Can't get any easier than that, now can it? Of course, you probably have a few edits and customizations you want to make. So with just a bit of guidance, you'll have the perfect layout ready for visitors and members alike for any upcoming service.
How to Change the Card Colors
If you want to change the card colors, you have two real options:
You can either change the paper you print it on, or change the colors in the program. It may be easier to just use a different colored paper. This way, you don't need to print an entire color background.
If you're changing colors in the card, the way you edit it will vary. If it is text, select the "T" text tool, click and highlight the text, then click the color menu. Select the text color text you want. If you want to change the background color, you will need to create a new "layer" in the software.
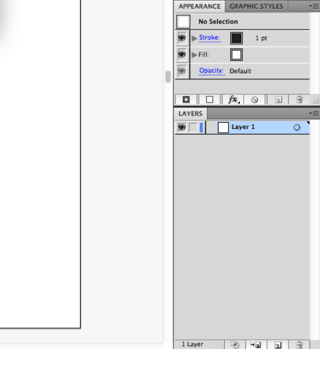 In the bottom right corner of the screen you'll find a list of the layers in your file. Underneath this there is an icon that looks like a folder or a paper with a folded over corner. Click this to create a new layer. Now, click on the new layer and drag it to the very bottom of the list. This way, all the text and images appear "on top of" it. With the new layer selected, click on the tipping paint can logo. This is the "Fill" option. In the color pull-down menu, choose the color you want and then click anywhere on the Welcome Card. This changes the entire background card color.
How to Edit and Add Text
You need the text to say what you want. What we provided is just filler. First select the "Text Tool" from the left side of the window. It looks like a big "T."
Now, drag the "new text type" icon in between the letters of the text you want to replace. Click. This activates the text layer. You can now highlight the text and type your own into the space.
Of course, you don't need to use all the pre-created text lines we added. Maybe you want to add in a footnote or some other important information. That isn't a problem at all. There are a few ways to do this, but we recommend creating a new layer first. If you just add new text, it will be saved to whichever layer is currently selected. This means if you go to change the placement of the text, it may affect everything in the layer.
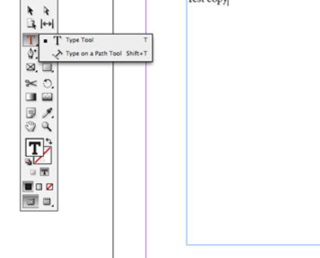 With the new layer, select the "Text" tool on the left side of the screen. This is the capital "T" icon. Once you click this the icon turns into a vertical bar-shaped icon that looks like a cursor. Click on the area you want to add the new text and type what you desire. When you select the "Text" tool, you'll see some text edit features pop up on the screen. Here you can change the font, font size, and justification. The additional text edit tools include the ability to change the distance between characters (this is called "kerning" and it is extremely helpful when one or two letters won't fit onto the card but you don't want to reduce the font size).
How to Print Them
To bring up the print menu, select "File," then "Print." It is highly recommended to always save your completed welcome card before printing. After you save and bring up the print menu, you'll have a few options. If your printer is a double-sided printer, it will be much easier (or if you're only printing on one side of the page). On the print menu, you can select the paper size. Click on the pull-down menu to choose the right print size you're looking for. 8.5 by 11 is the standard, but you can go down to note card size.


